How to use Dictato
Dictato turns your voice into text in any Mac app, processed entirely on your device. This manual walks through Dictato screen by screen (the menu bar, the setup assistant, the recording flow, and every Settings tab) so you can find and understand each option.
New to Dictato? Read sections 1 to 3 to get dictating in a few minutes, then dip into the Settings screens as you need them.
1. The menu bar, your home base
Dictato has no Dock icon. It lives in the macOS menu bar at the top of your screen. Click its icon to open the panel where everything starts.
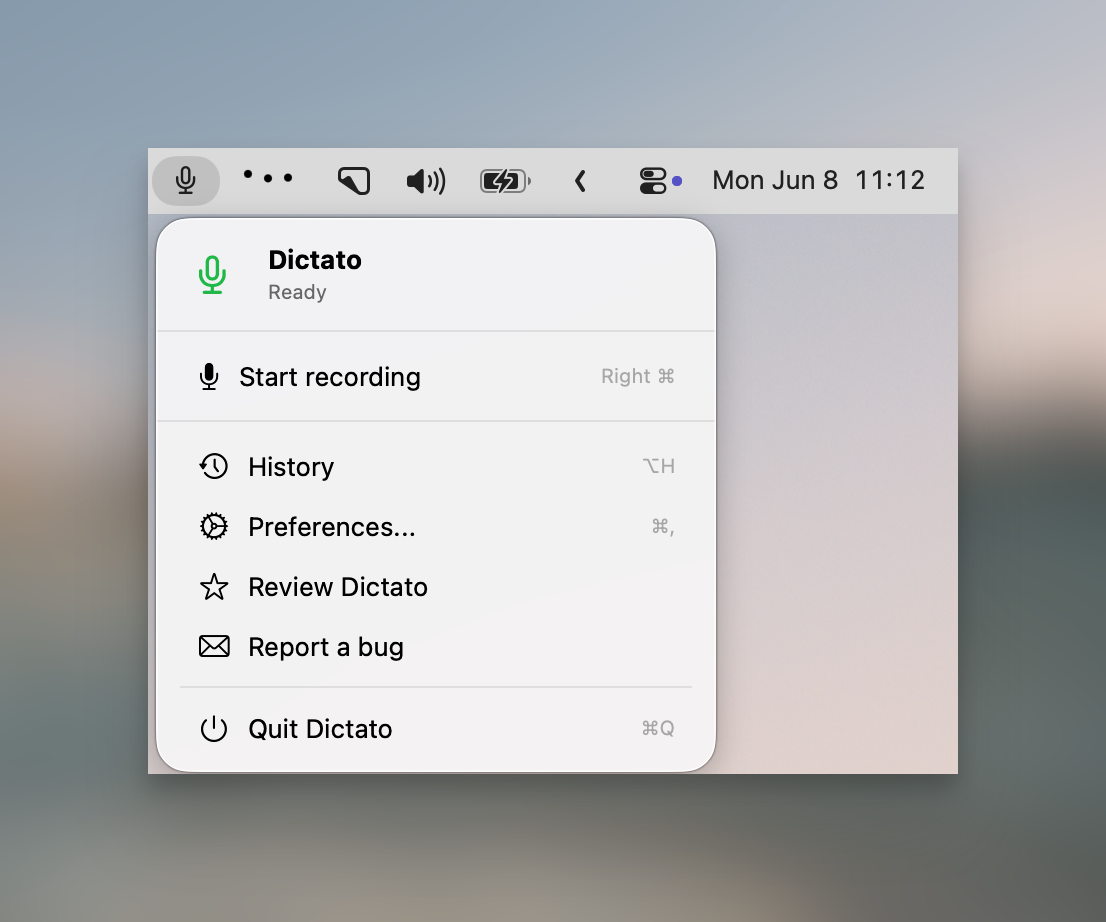
From here you can:
- See the status. The icon and label show whether Dictato is idle, recording, transcribing, or inserting.
- Start / stop recording. The main button shows your current hotkey. While recording you can stop, or Cancel with Esc.
- Open History (⌥H) and Settings (⌘,).
- Report a Bug, and once licensed, Review Dictato.
- Update Dictato when a new version is available, and Quit (⌘Q).
The panel also surfaces what is needed to get going ("Configure permissions" or "Download model") and links to your license when a trial ends.
2. First launch & setup
The first time you open Dictato, a short setup assistant runs. You can re-open it any time from Settings → General → Relaunch setup assistant. For a guided walkthrough, see setting up dictation on macOS.

- Welcome. A quick intro to what Dictato does.
- Try it. Grant Microphone access and record a test phrase, so you see transcription work before committing.
- Accessibility. Grant Accessibility access, which is what lets Dictato type text into other apps.
- Hotkey. Choose your recording key and whether to hold or tap (see section 3).
- Activate. Start your free trial, or enter a license key.
You can close the assistant early with the ×; Dictato applies sensible defaults, and you can change everything later in Settings.
3. Dictating: the recording flow
This is the loop you will use all day. You never leave the app you are working in. New to voice typing? Start with our beginner's guide to dictation on Mac.

Good to know:
- Hold vs toggle. In hold mode, recording stops when you release the key. In toggle mode, one tap starts and the next tap stops, handy for longer dictations.
- Cancel anytime. Press Esc while recording to throw it away; nothing is inserted.
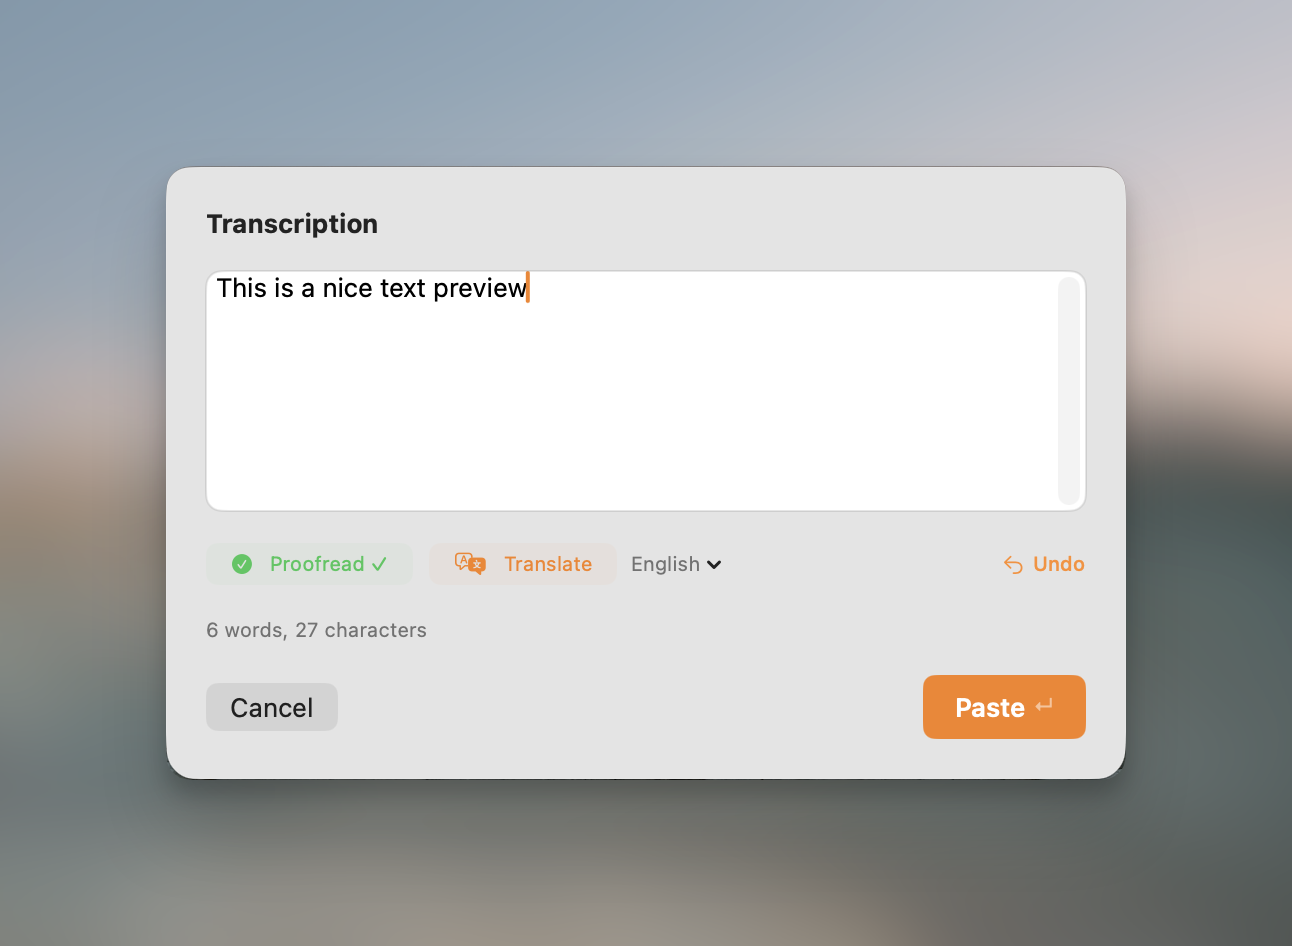
- Preview before inserting. By default the text is pasted directly. Turn off "Direct injection" (section 6) to get a small preview window where you can read and edit the result before it lands.
4. The Quick Settings panel
A compact floating panel for flipping the options you change most, without opening full Settings. Open it with its hotkey (⌥Q by default).
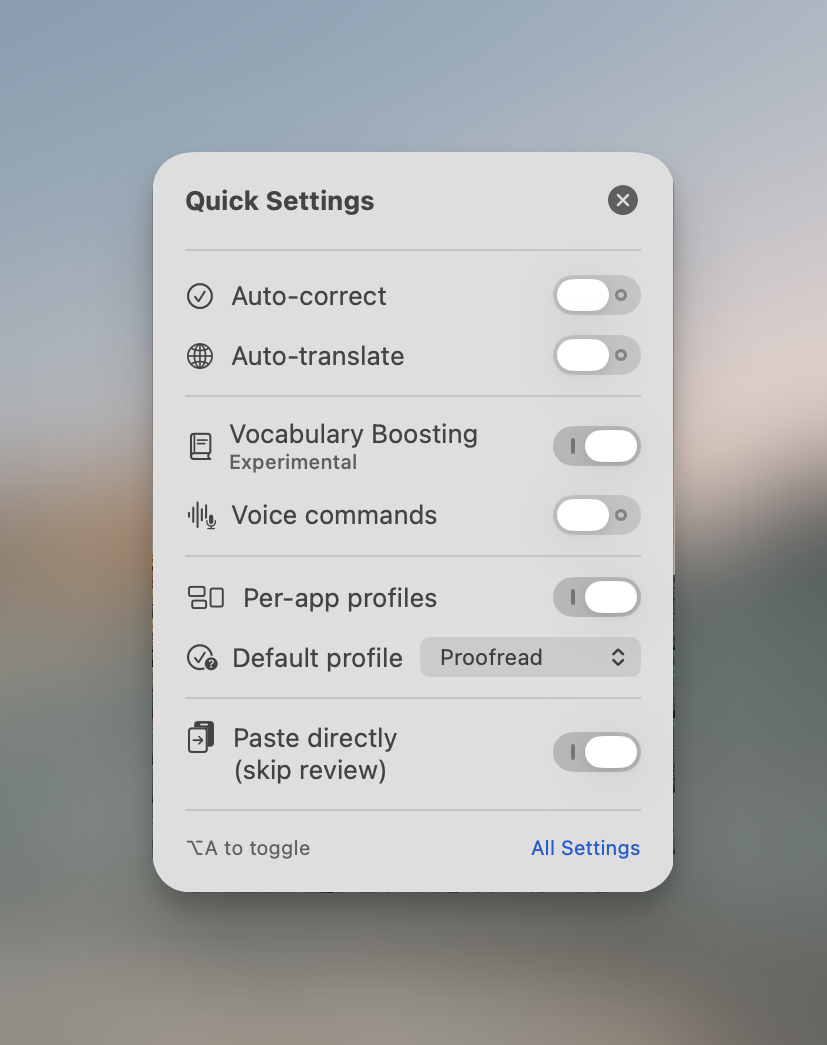
- Auto-correct and Auto-translate (with a target language) when Apple Intelligence is available.
- Vocabulary on/off and Voice commands on/off.
- Profiles on/off, plus the default action to apply when an app has no rule.
- Direct injection: paste straight in, or use the preview window.
- An All settings… link to open the full window.
"Apple Intelligence" is Apple's free on-device AI, available on recent Apple Silicon Macs. Some features (like auto-translate) need it; for proofreading and tone rewrites, Dictato can use its bundled Gemma engine instead, so those work even without it.
5. The History window
A searchable log of your dictations. Open it with ⌥H or from the menu. History is on by default. You can turn it off any time in Settings → History (section 10).
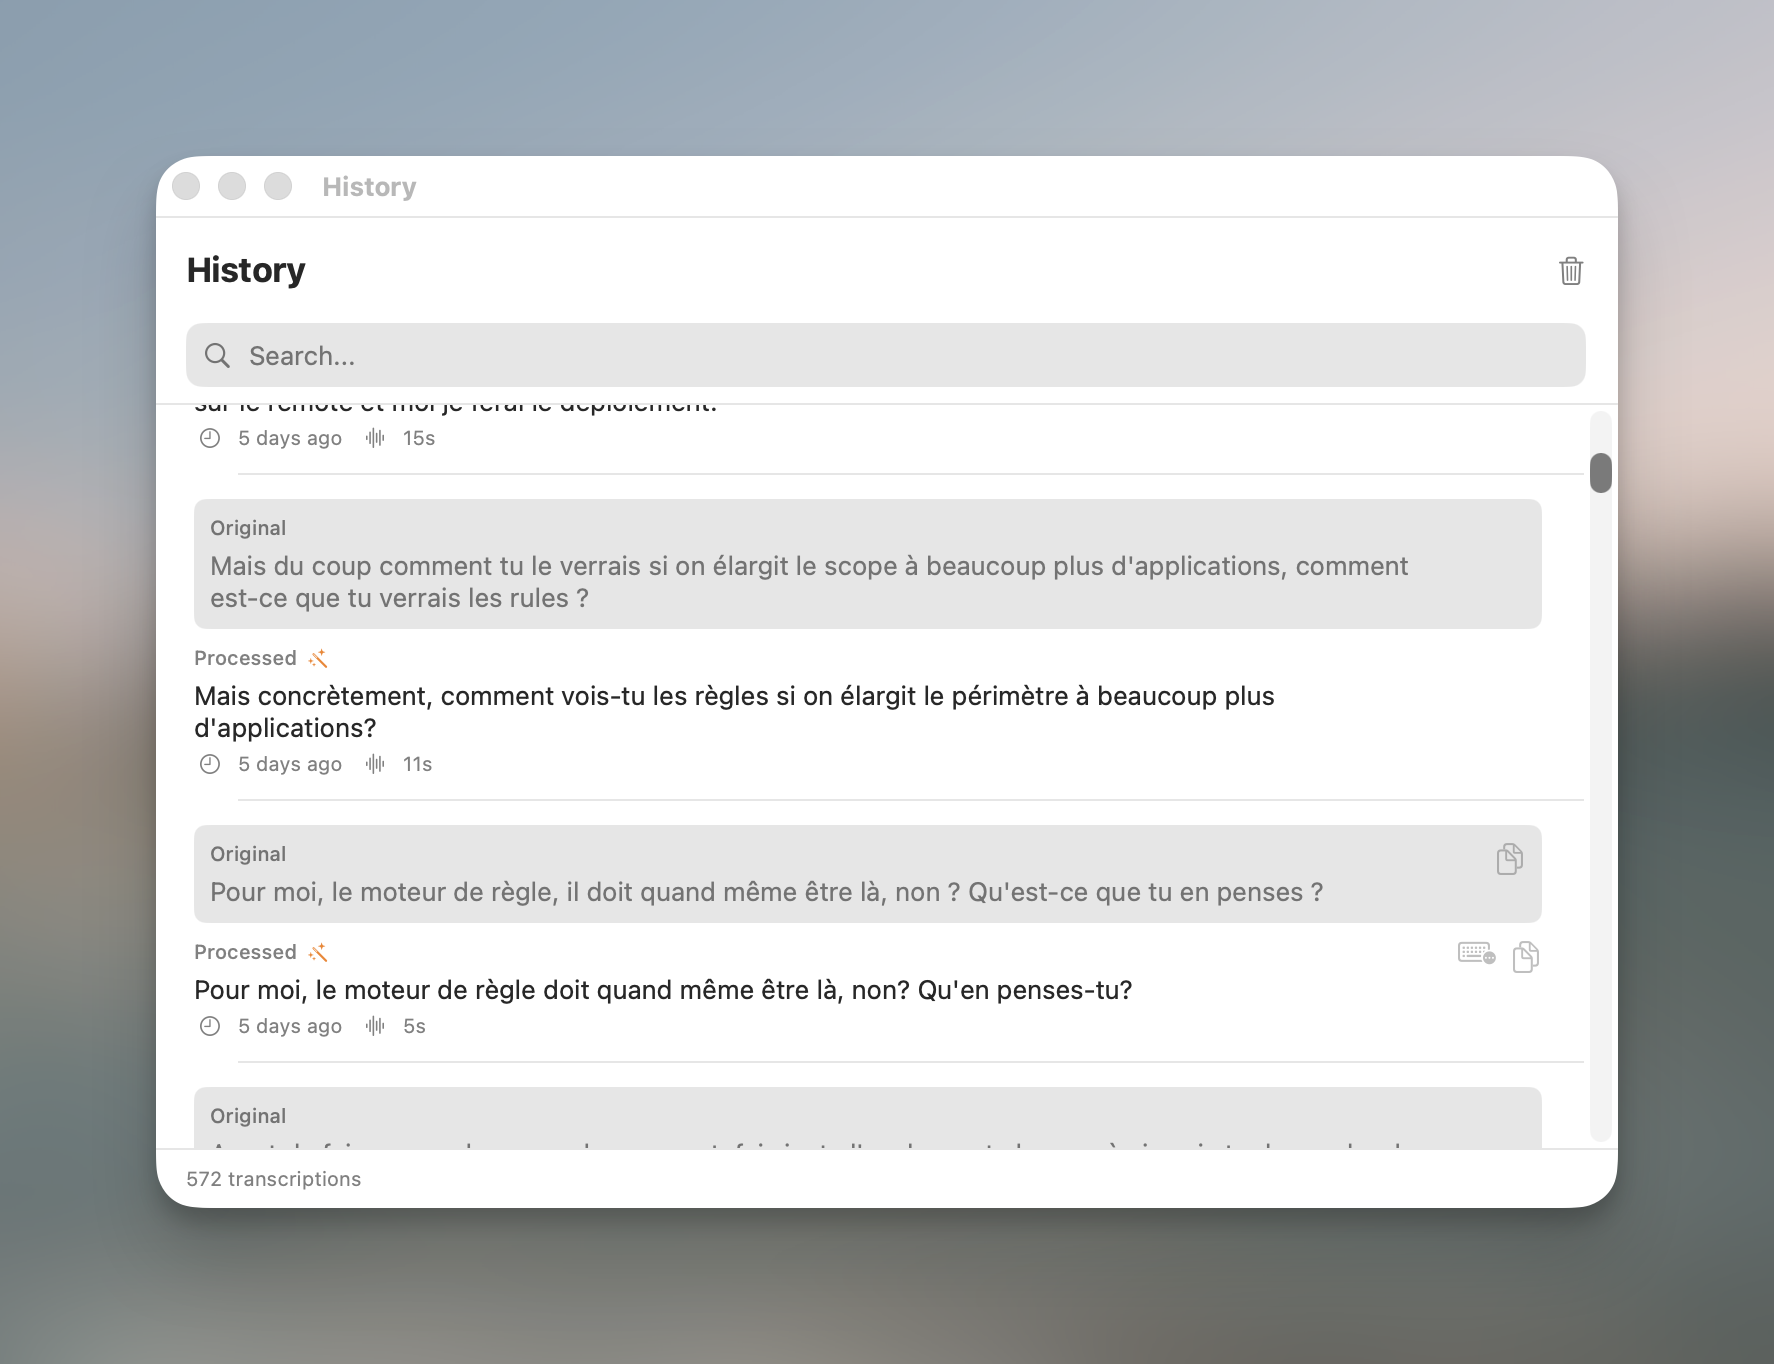
- Search across all entries from the bar at the top.
- Each entry shows the original transcript and, when AI changed it, the processed version (marked with a ✨ icon), plus the time and recording length.
- Hover an entry to re-insert it at your cursor, copy the original, or copy the processed text. Right-click for the same actions plus delete.
- Clear everything with the trash icon in the top-right.
6. Settings · General
Open Settings from Dictato's menu bar icon, then choose Settings. The General tab covers your shortcuts and core behavior.
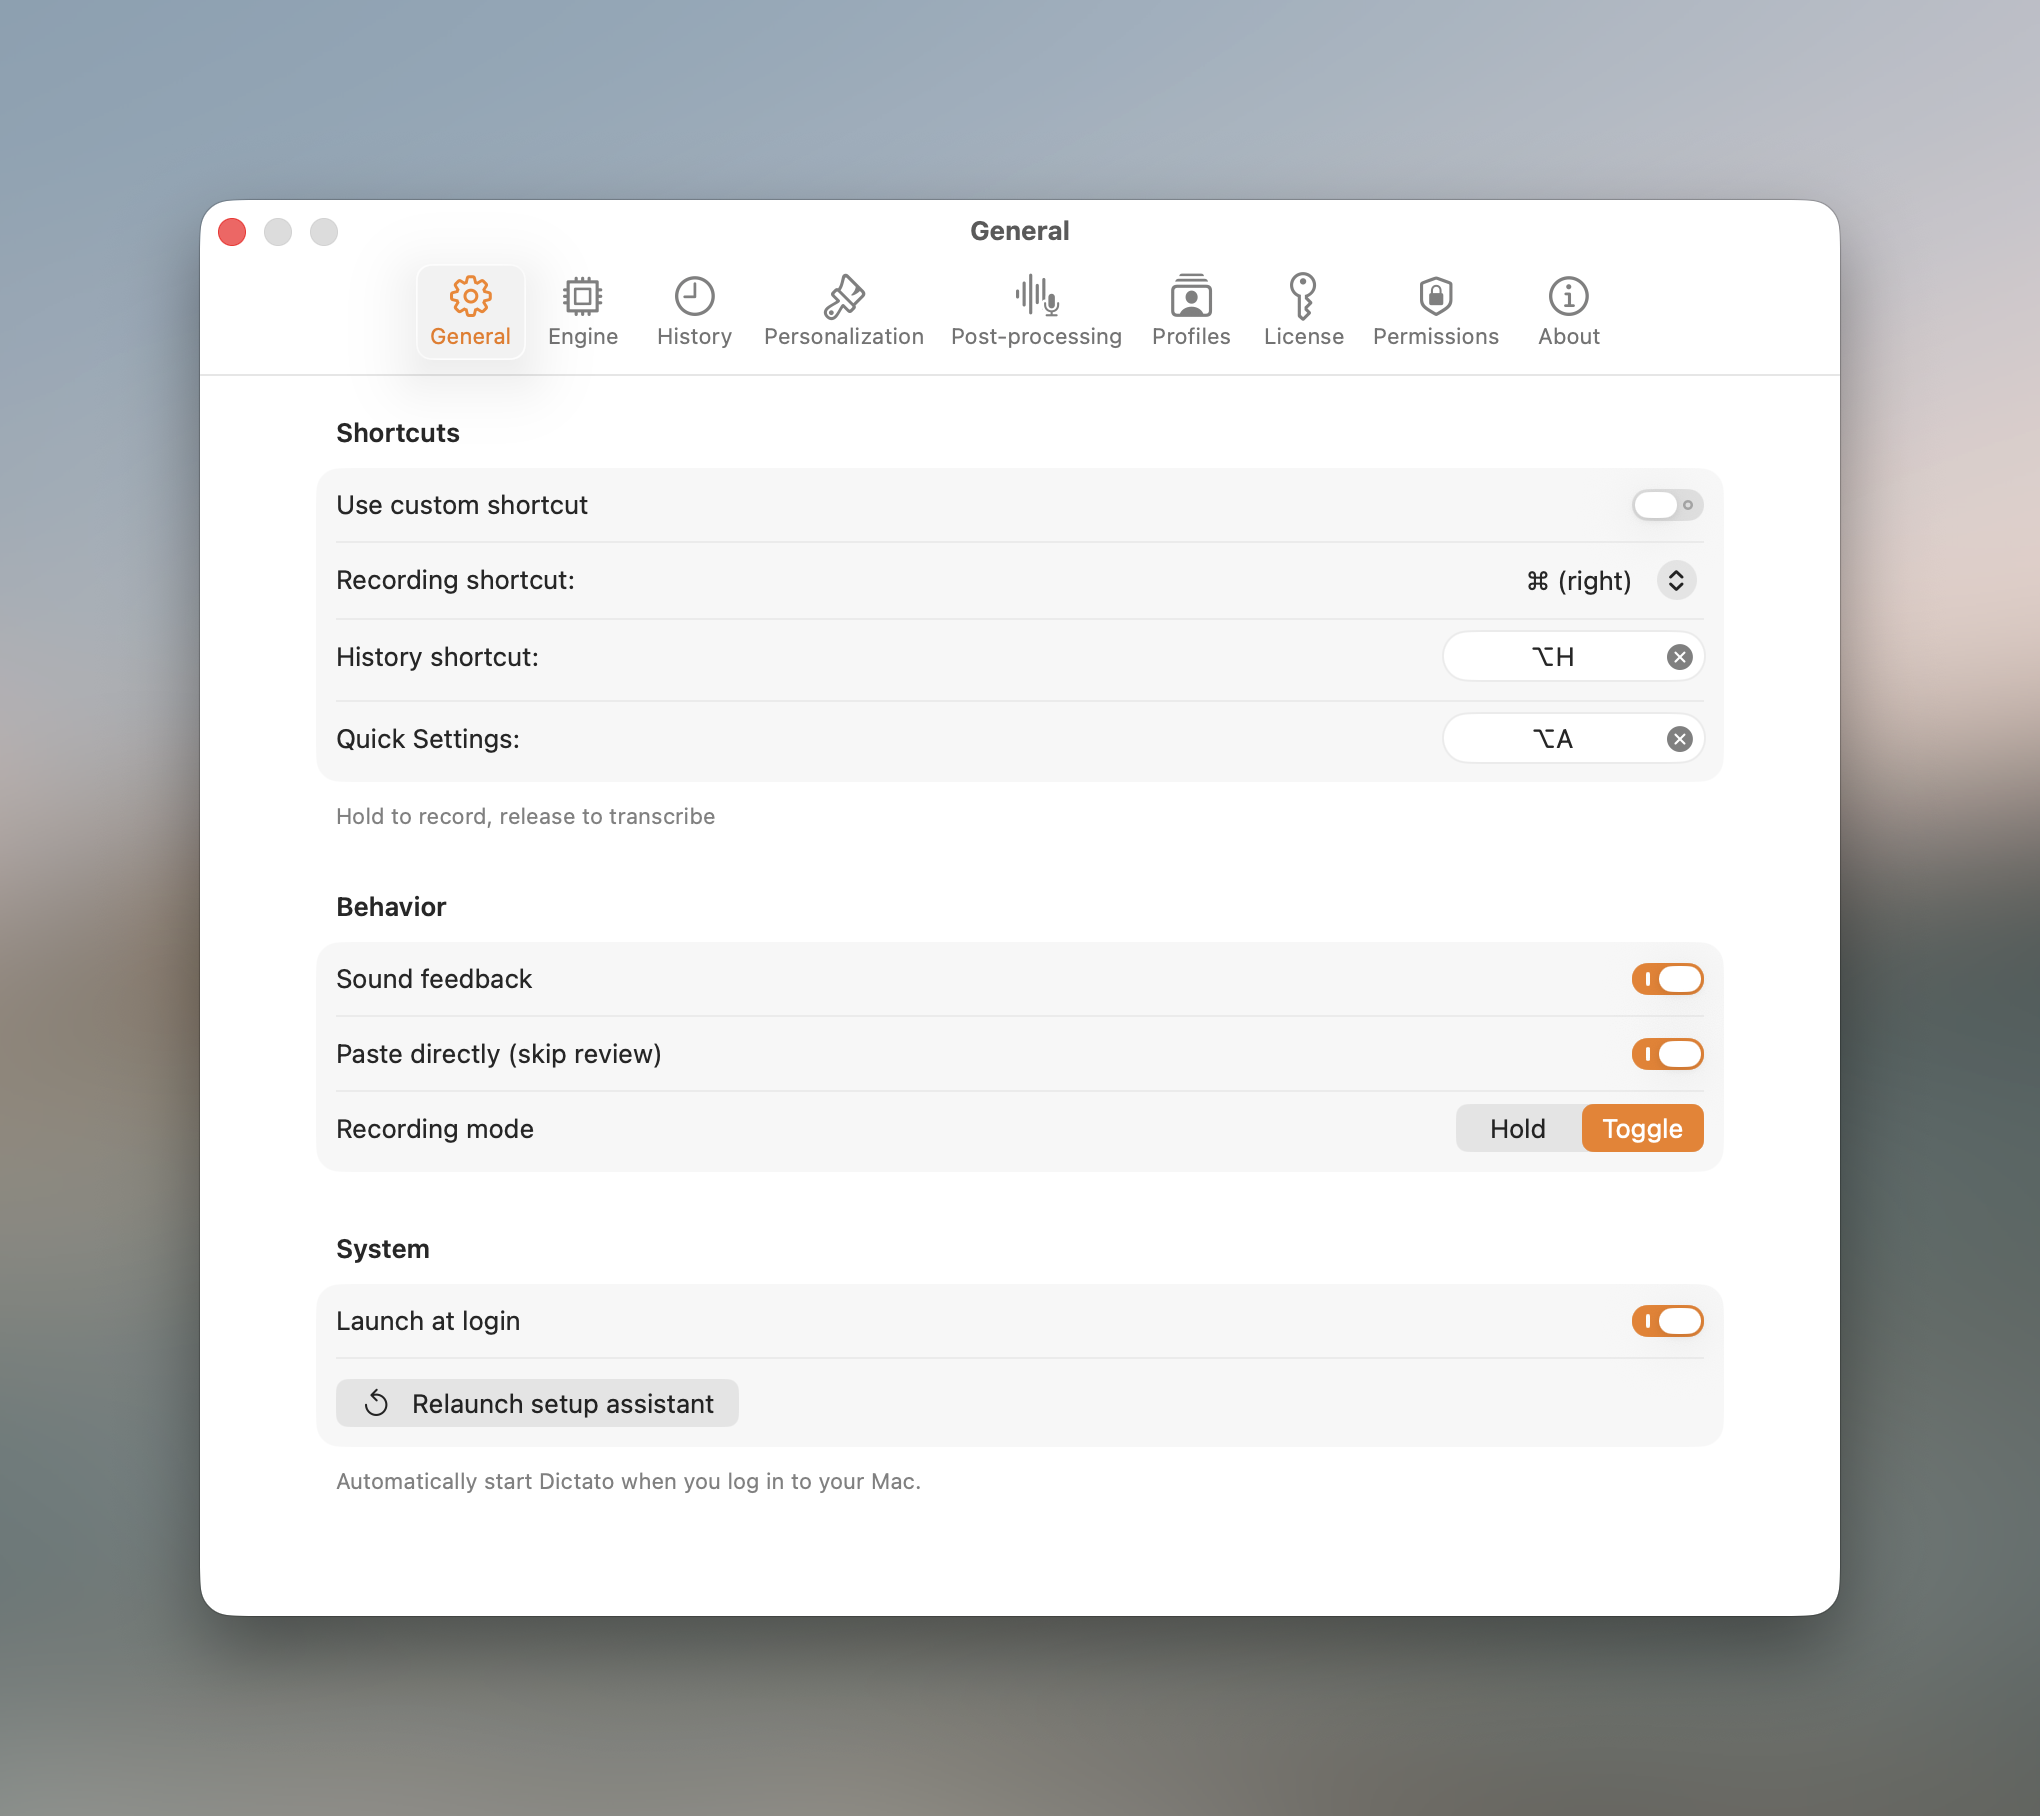
- Recording shortcut. Use a modifier key (Right Command by default) or switch to a fully custom keyboard shortcut. To change the dictation hotkey, pick a different modifier or record your own shortcut here. You can also set shortcuts for History and Quick Settings.
- Sound feedback. Optional start/stop chimes so you know recording began without looking.
- Direct injection. On = paste straight into the app. Off = show the preview window first.
- Recording mode. Hold to record, or tap to toggle.
- Launch at login. Start Dictato automatically with your Mac.
- Relaunch setup assistant. Re-run the first-launch walkthrough.
Anonymous analytics: trial period only. The optional, anonymous usage analytics exist only during the free trial. They never include anything you dictate, and they stop completely the moment you activate a license. The paid app collects nothing.
7. Settings · Engine
The engine is the brain that turns audio into text. All engines run locally on your Mac. Most download their model once, then work offline forever, and you can switch any time.
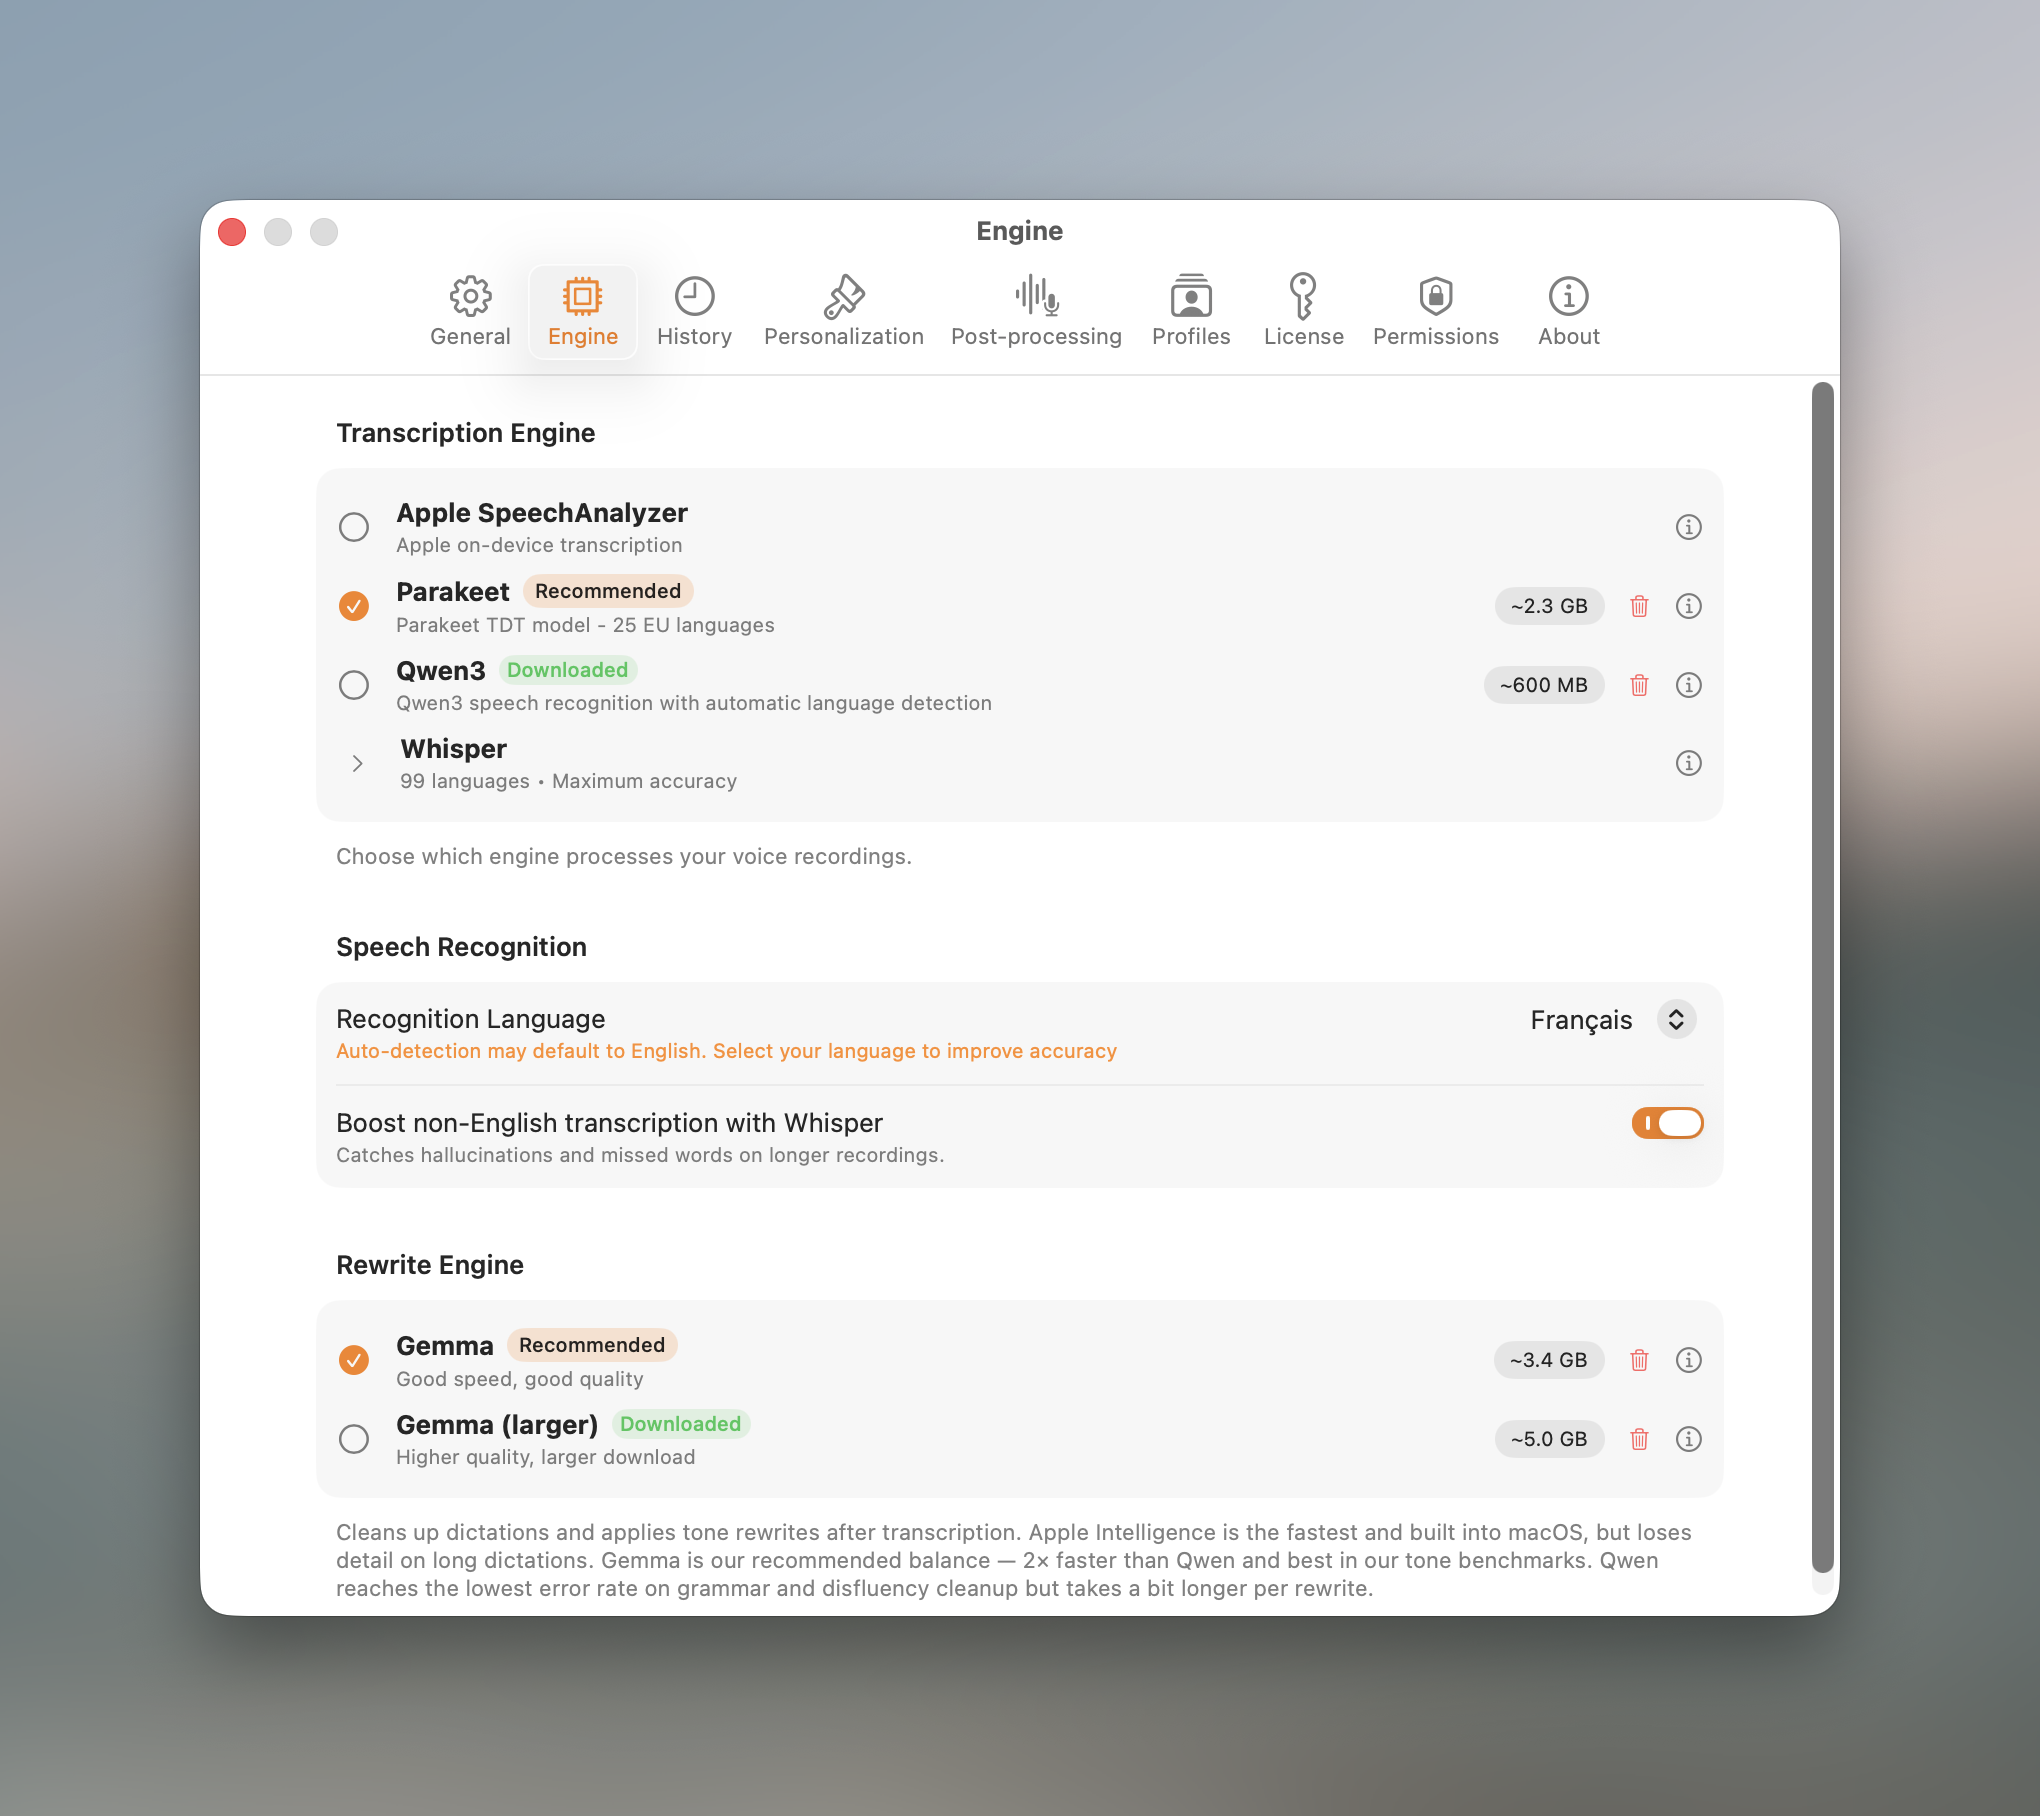
- Parakeet (recommended): the best balance of speed and accuracy for everyday use; 25 European languages.
- Whisper: six quality levels from Tiny (instant) to Large v3 (most accurate); 99 languages. Expand the row to choose a level.
- Qwen3: a compact multilingual alternative (macOS 15 Sequoia or later).
- Apple SpeechAnalyzer: Apple's built-in engine, no download, on macOS 26 Tahoe or later.
Below the picker:
- Transcription language. Pin a language for best accuracy, or leave it on Auto.
- Multilingual helper. When Parakeet runs a non-English language, an optional Whisper helper acts as a safety net for tricky audio. See multilingual voice typing on Mac.
- Rewrite engine. Choose what powers proofreading and tone rewrites: Apple Intelligence (built into macOS) or Gemma (a one-time on-device download tuned for clean, faithful rewrites).
Not sure? Stay on Parakeet. Reach for Whisper only when you need a language it does not cover. See our Whisper vs Parakeet vs Apple engine comparison.
8. Settings · Post-processing
What happens to your words after transcription, before they are inserted. Every stage is optional and under your control. The first stages below require Apple Intelligence.
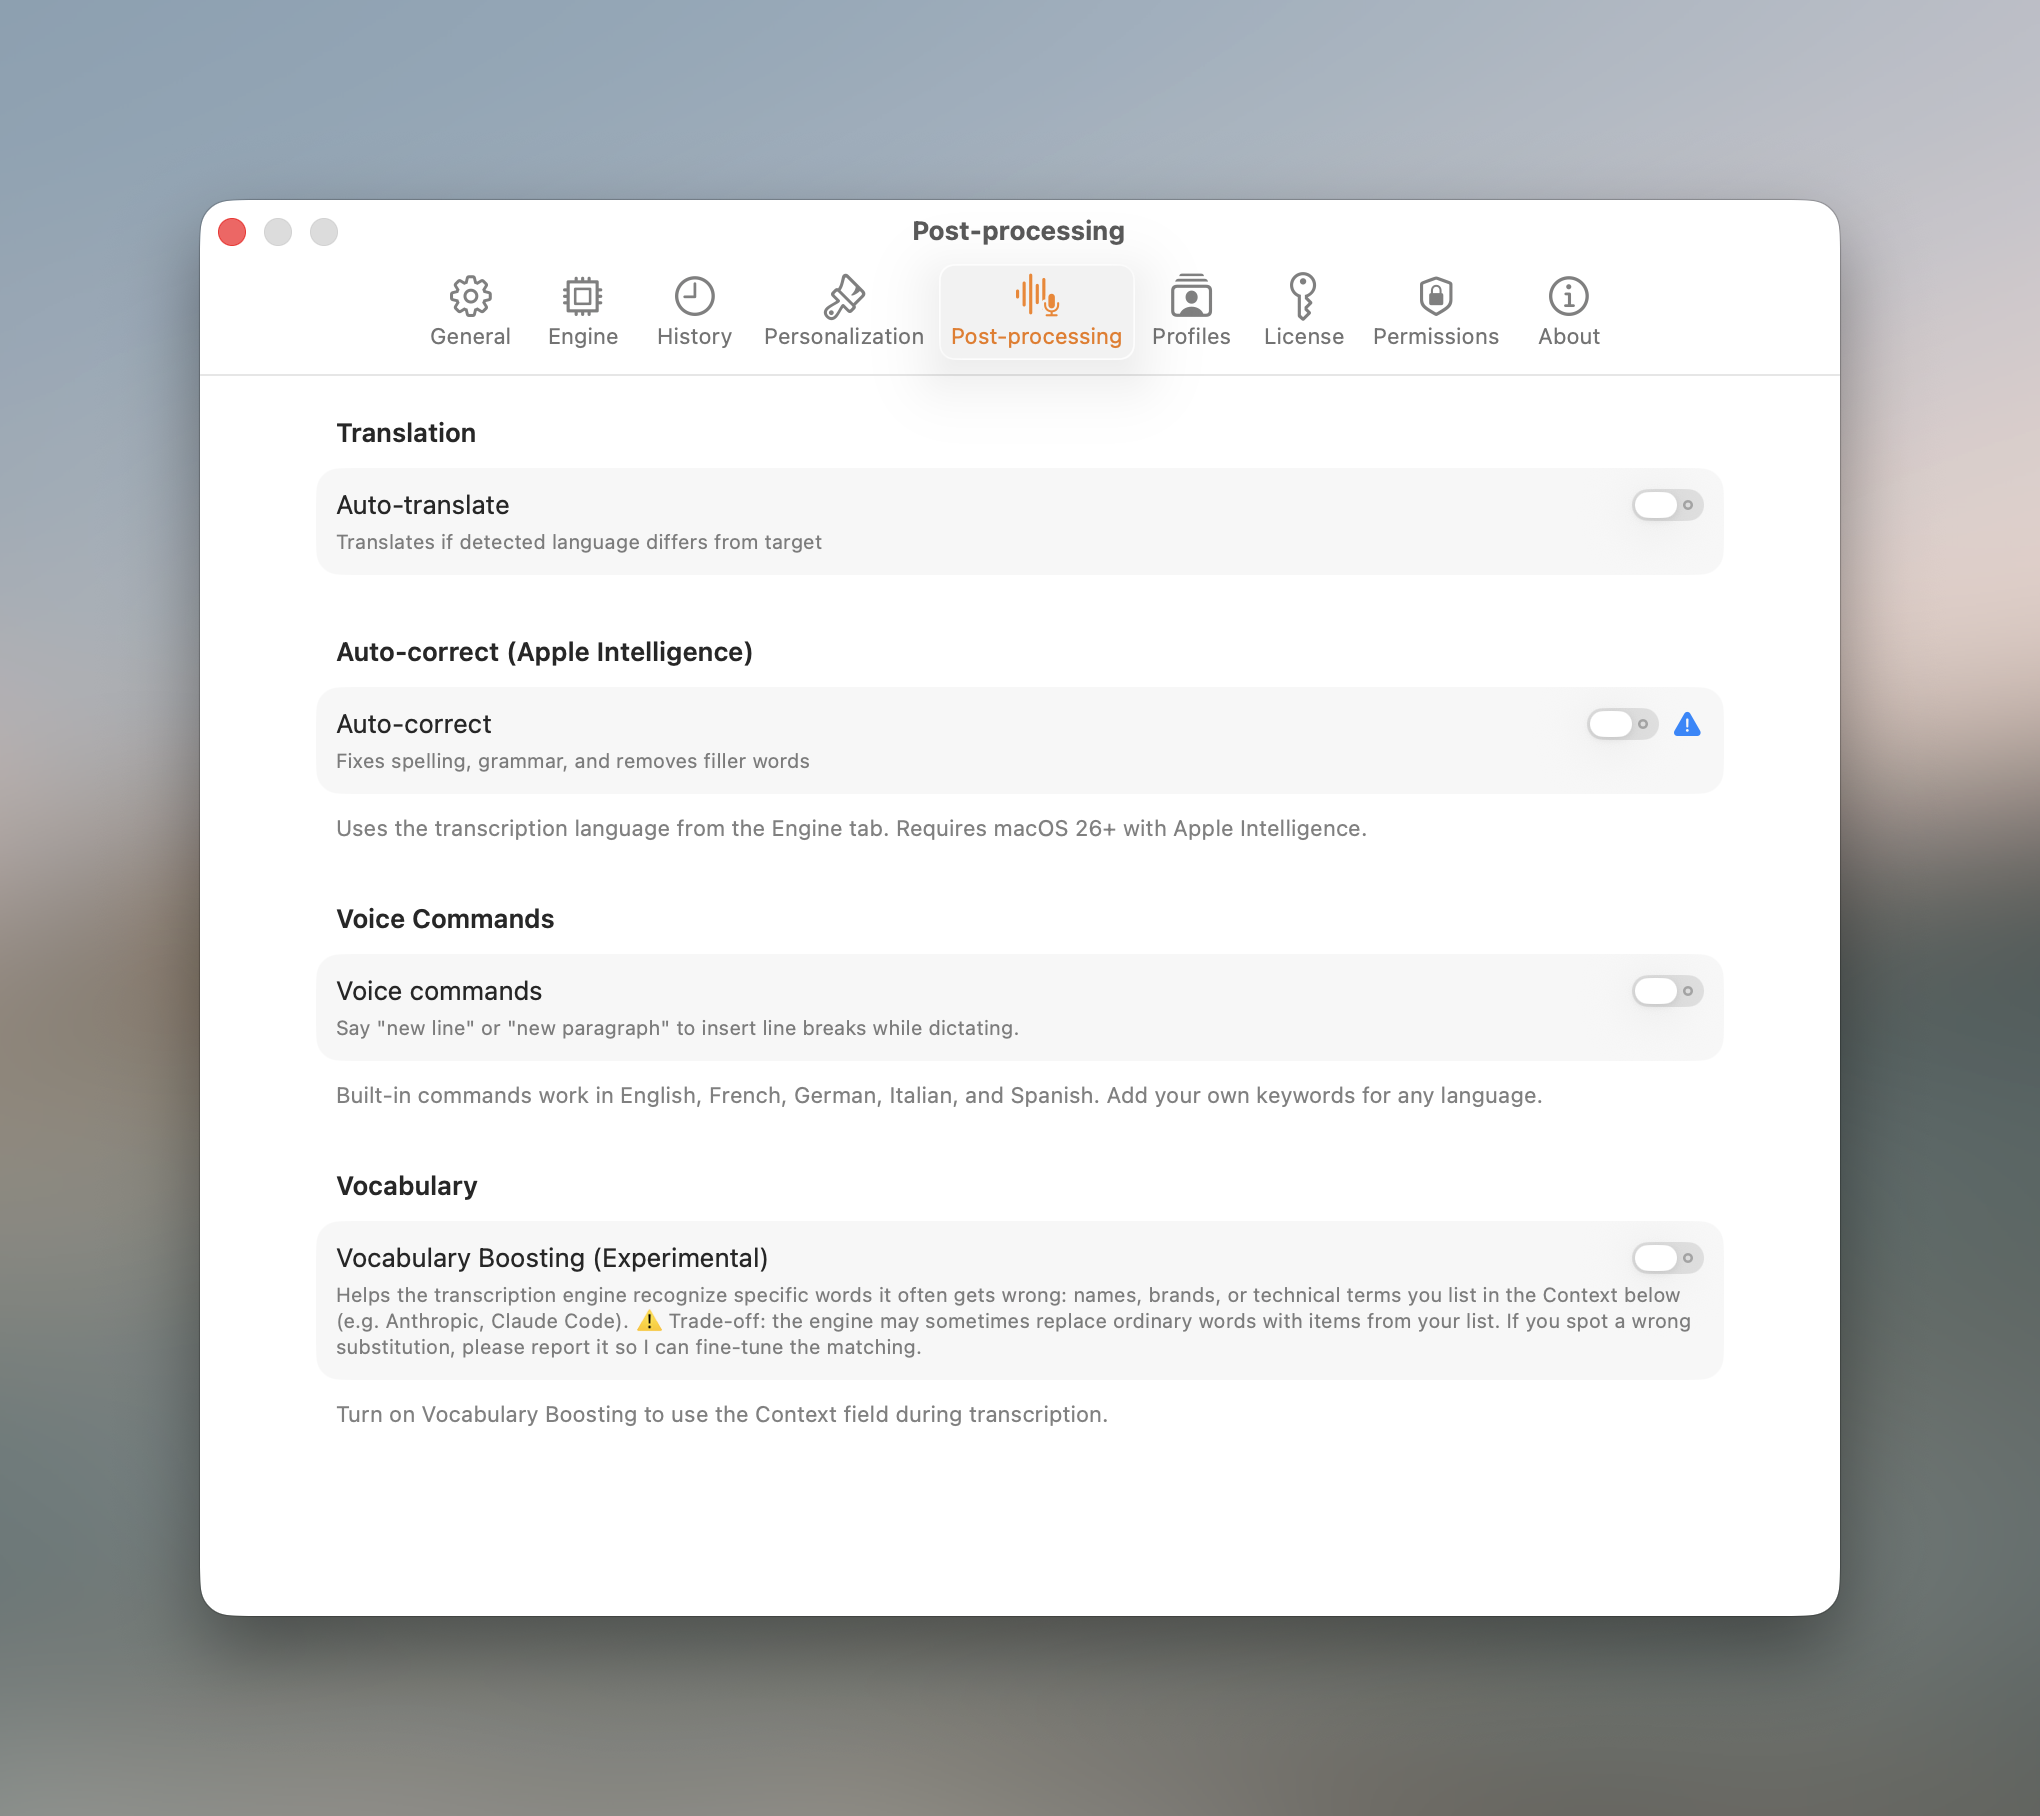
- Auto-translate. Translate your dictation into a chosen target language on the way out.
- Auto-correct (proofread). An on-device AI pass fixes grammar, punctuation, capitalization, and structure while keeping your wording.
- Voice commands. Say a phrase to insert formatting or symbols: "new line", "new paragraph", or "emoji rocket" → 🚀. Dozens are built in; open the editor to add your own word, emoji, or phrase, edit or disable the built-ins, and list several triggers separated by commas.
- Vocabulary. Teach Dictato the names, acronyms, and jargon you use, in the Context field (up to 200 characters). When you dictate one of those words, Dictato makes sure it comes out spelled the way you wrote it, even if the engine hears it slightly wrong. (On Parakeet this happens during transcription; on the other engines it's a quick correction step right after.)
Even without Apple Intelligence, Dictato always runs a deterministic cleanup that strips filler sounds and accidental duplicates, with no AI involved. Everything here happens on your Mac; read our speech-to-text privacy guide for how on-device processing works.
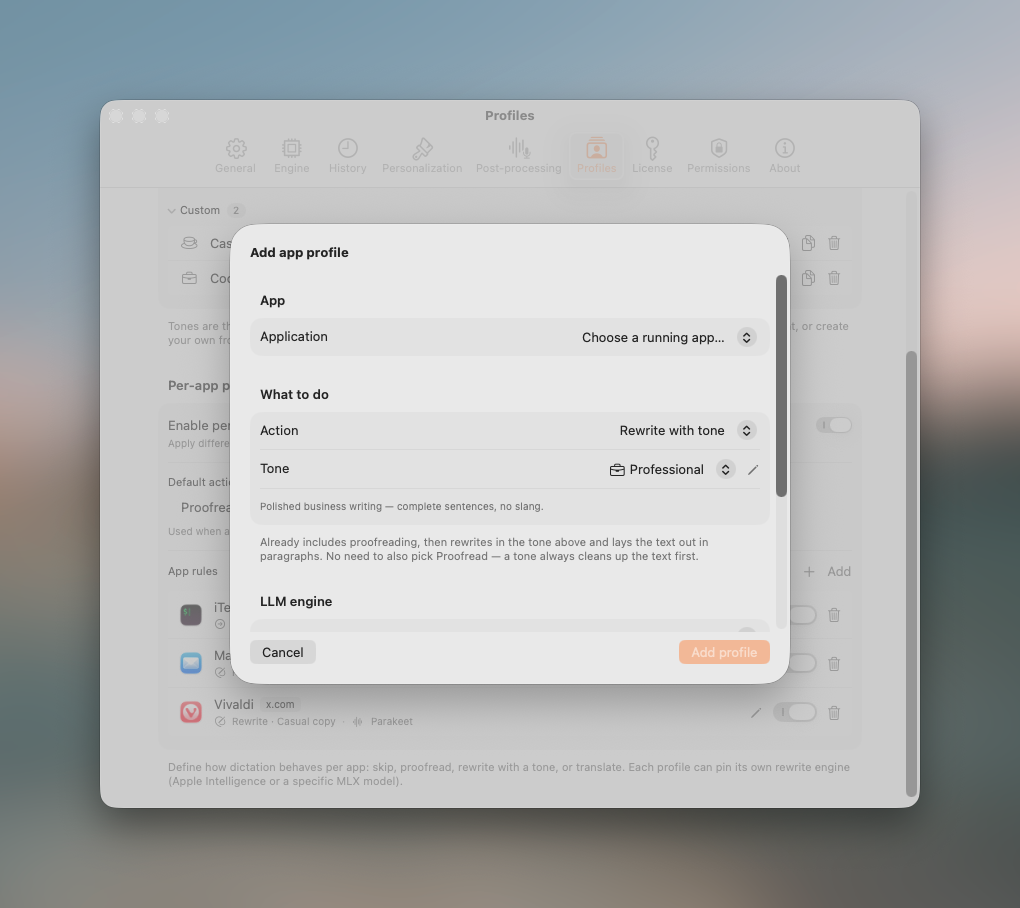
9. Settings · Profiles
Profiles are where Dictato gets personal: a library of tones you can apply, and per-app rules that decide what happens in each app.
Tones: rewrite into any style
A tone rewrites your dictation into a style instead of just tidying it. Dictato comes with a ready-to-use library of tones, so you can start right away:
The real power, though, is making them your own. From the tones library you can:
- Duplicate any tone (built-in or custom) and tweak it, for example start from Email and add your own sign-off.
- Create a brand-new tone from scratch with your own instructions.
- Edit a built-in directly; your change is saved as an override you can reset to the original at any time.
Per-app rules
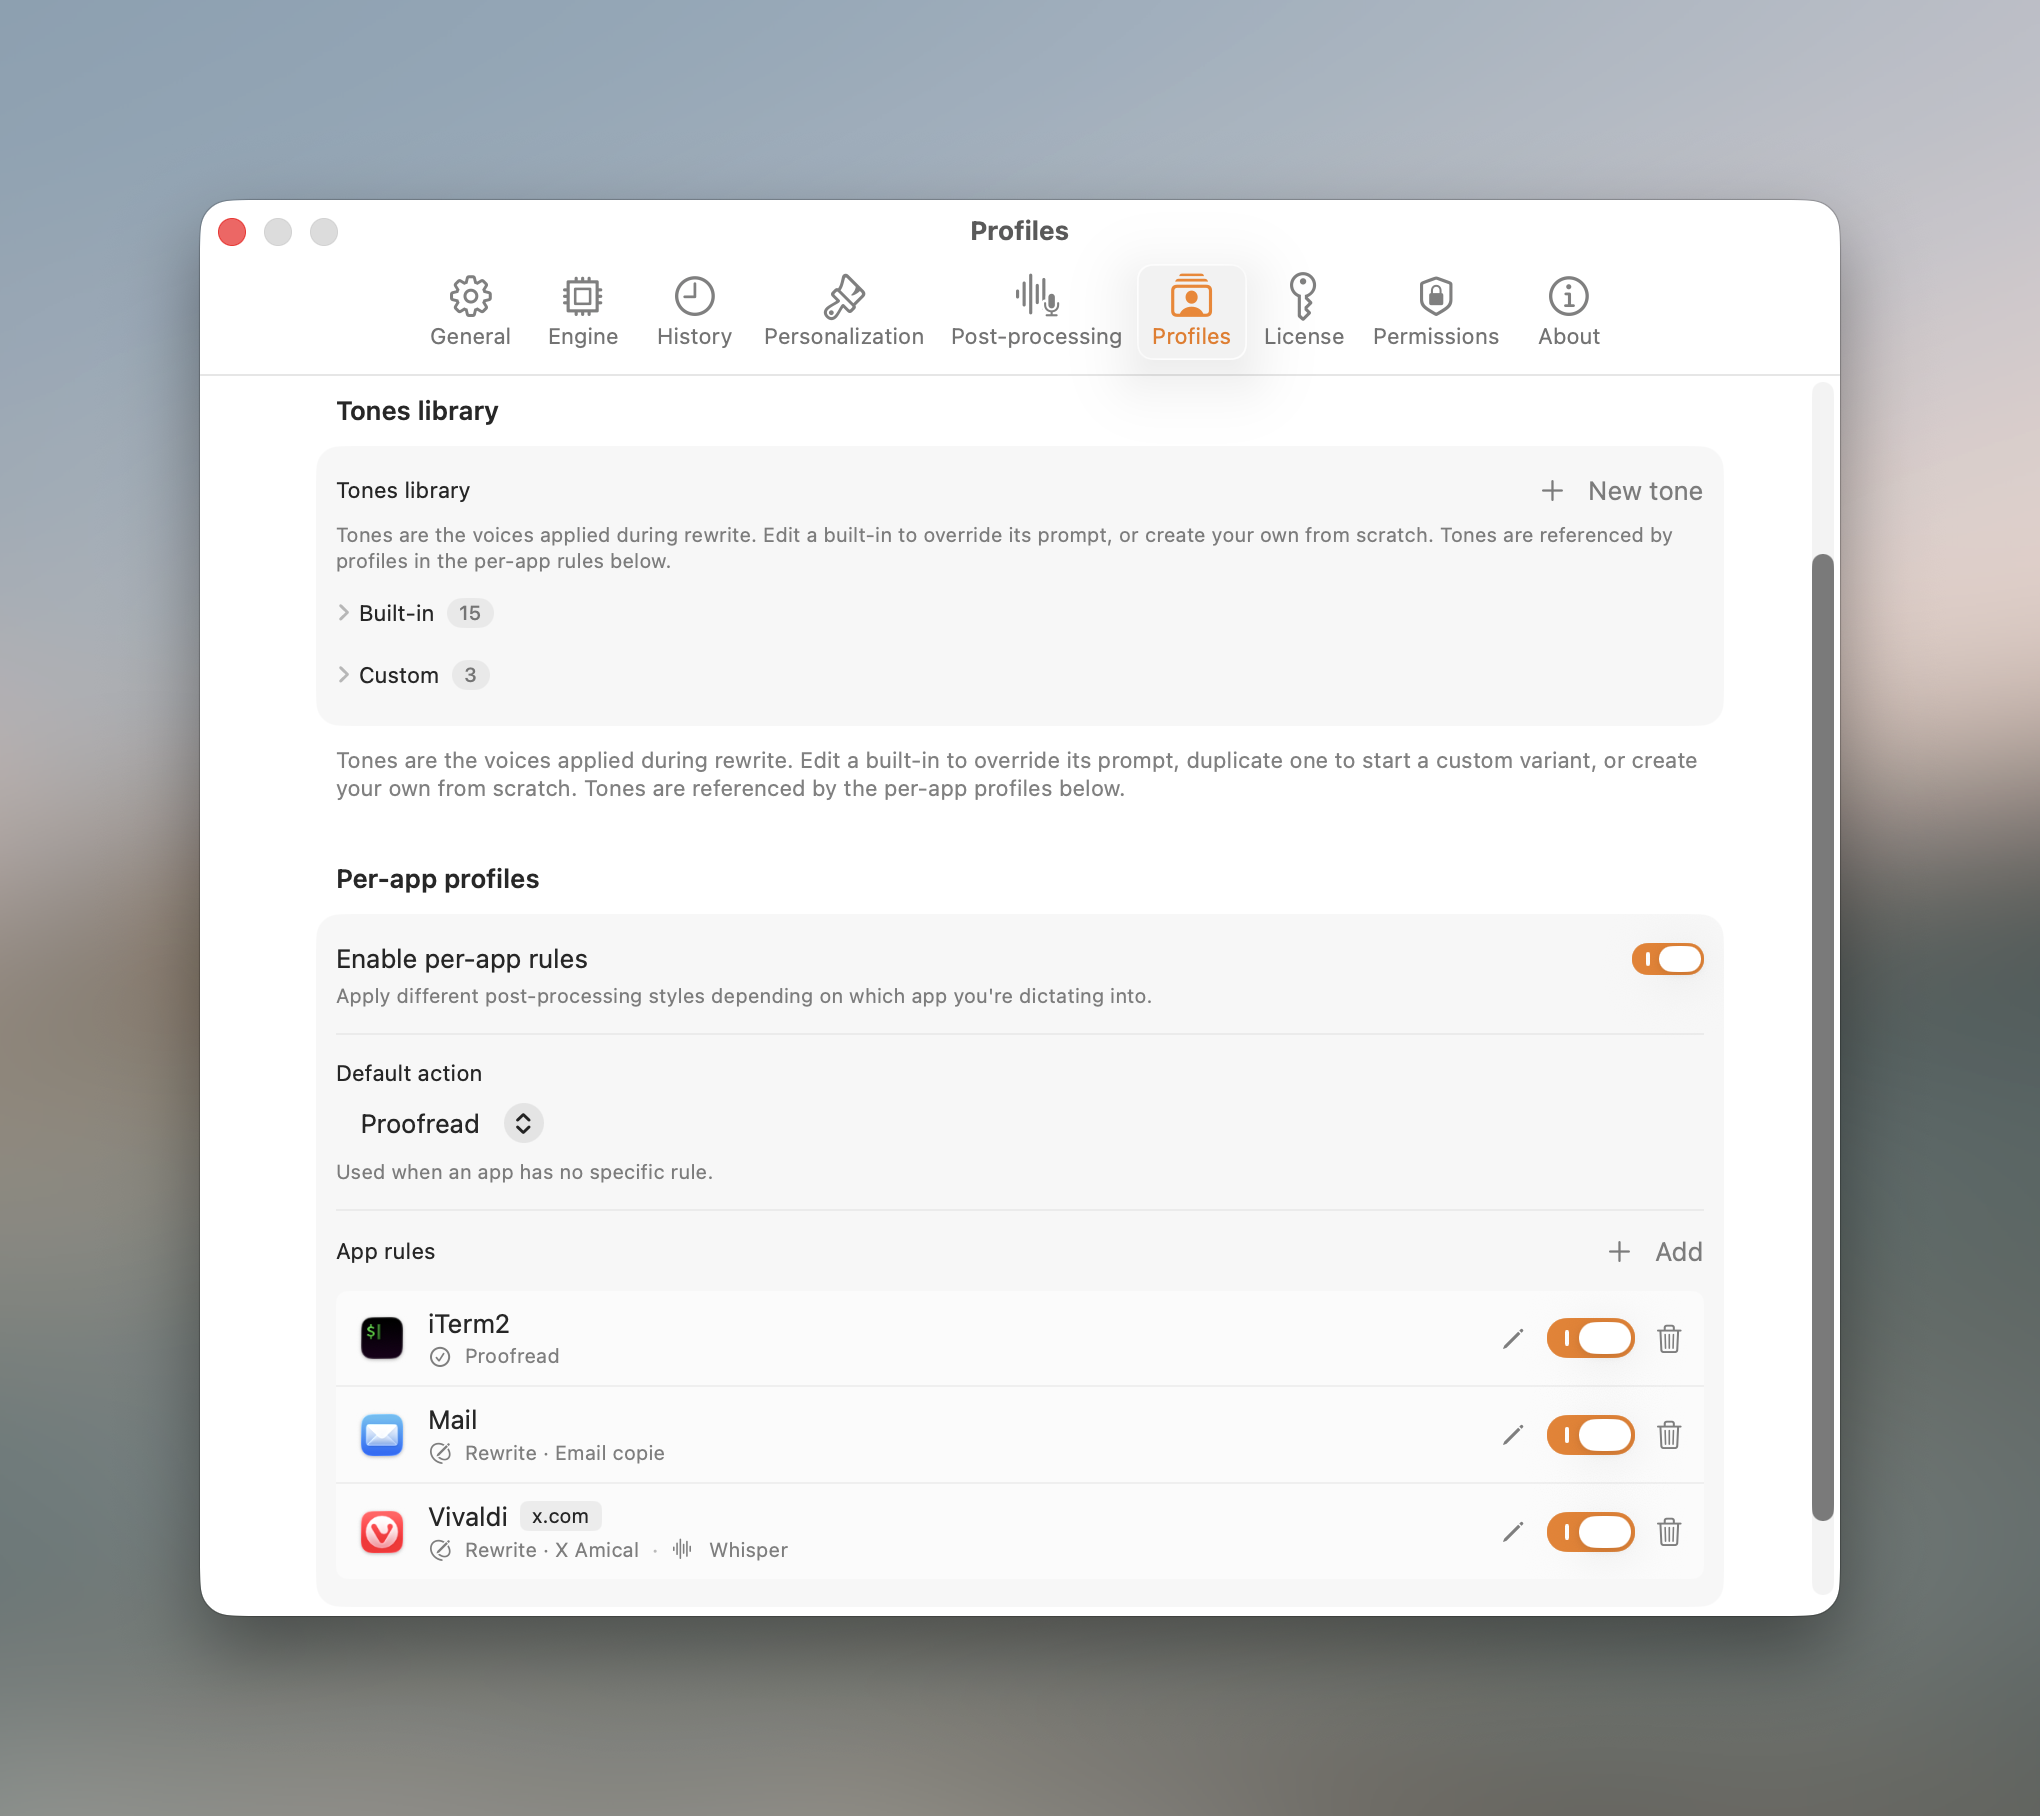
- Default action. What to do in apps without a rule: leave text verbatim (Skip), Proofread, Rewrite with a tone, or Translate.
- Add a rule. Pick an app (or type a custom bundle ID), then choose its action.
- Per-site rules. For supported browsers, scope a rule to a URL pattern like
mail.google.comor*.slack.com. - Engine overrides. A rule can pin its own transcription engine (and Whisper quality level) and its own rewrite engine, independent of your global defaults.
Profiles and tone rewrites are a beta feature. Rewrites are generated by on-device AI and can contain mistakes, so always review the result before relying on it. Per-site rules read the active tab's address, so a browser rule will ask for macOS Automation permission the first time it runs.
10. Settings · History
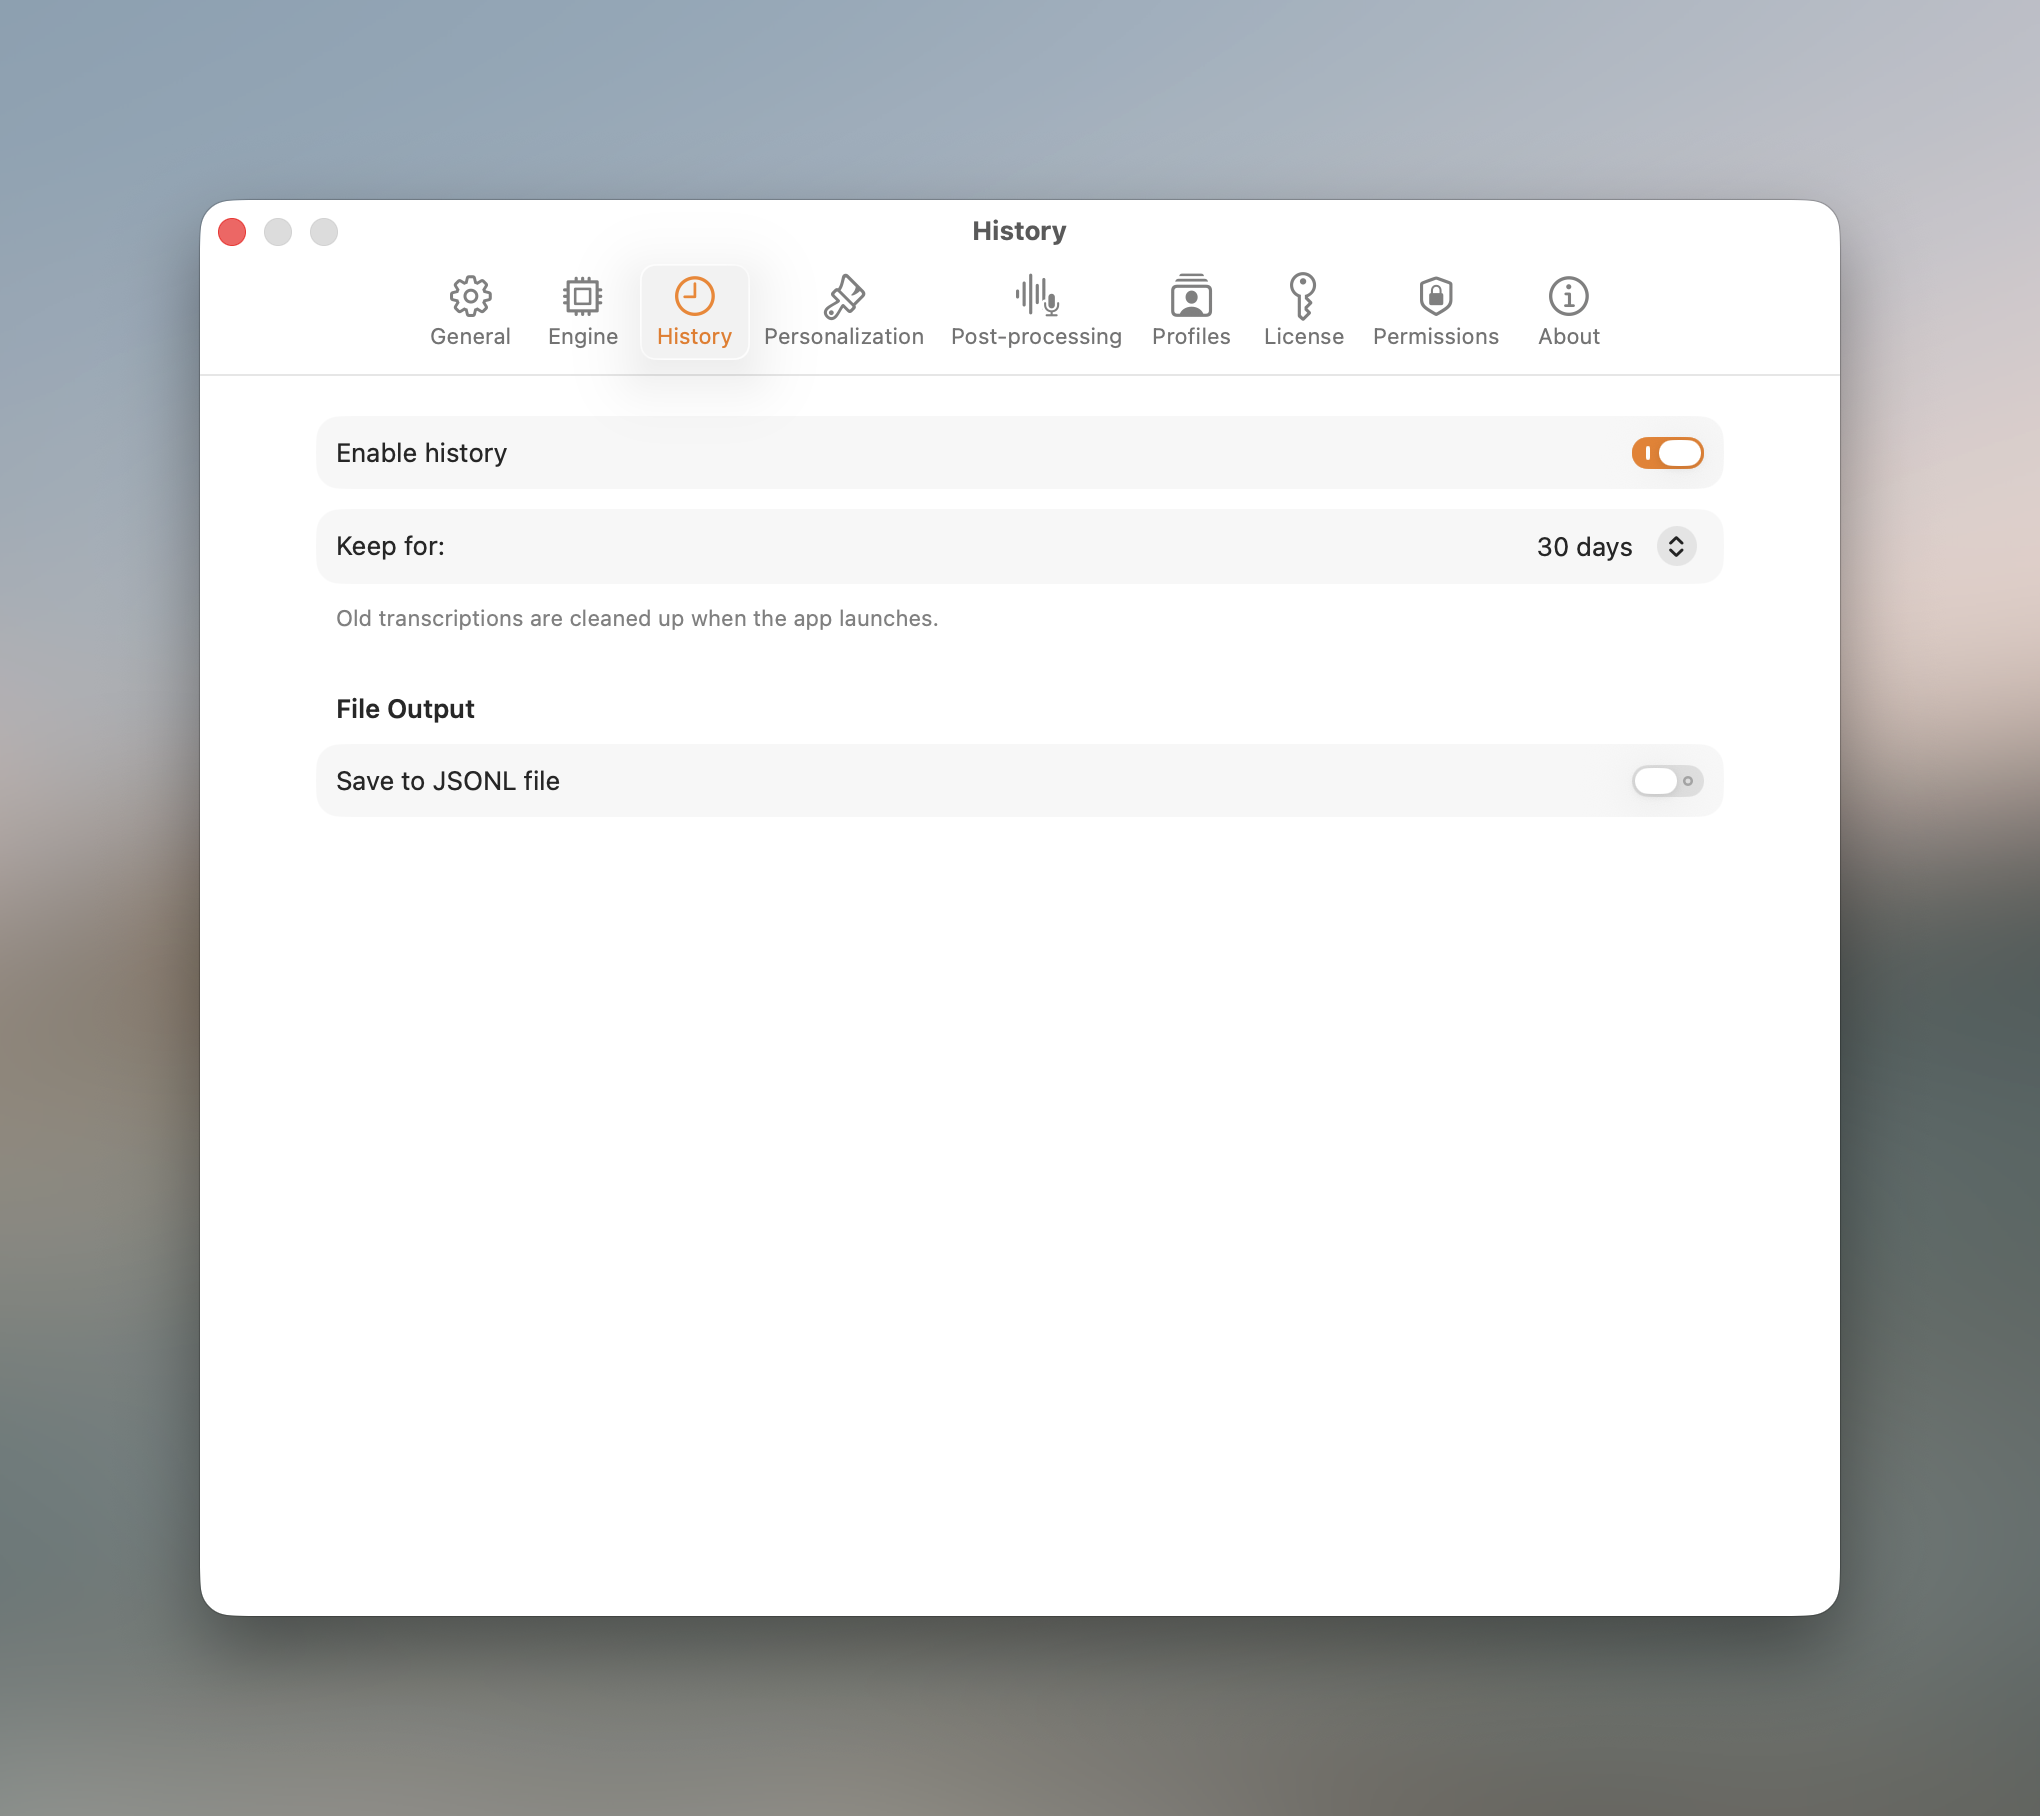
- Enable history. On by default. Turn it off to stop keeping the searchable log described in section 5.
- Retention. Keep entries for 7, 14, 30, 90 days, or unlimited. Older entries clean themselves up.
- Output to file. Optionally append every dictation to a local
.jsonlfile. A file-only mode logs without inserting text.
11. Settings · Personalization
Make the recording indicator yours.
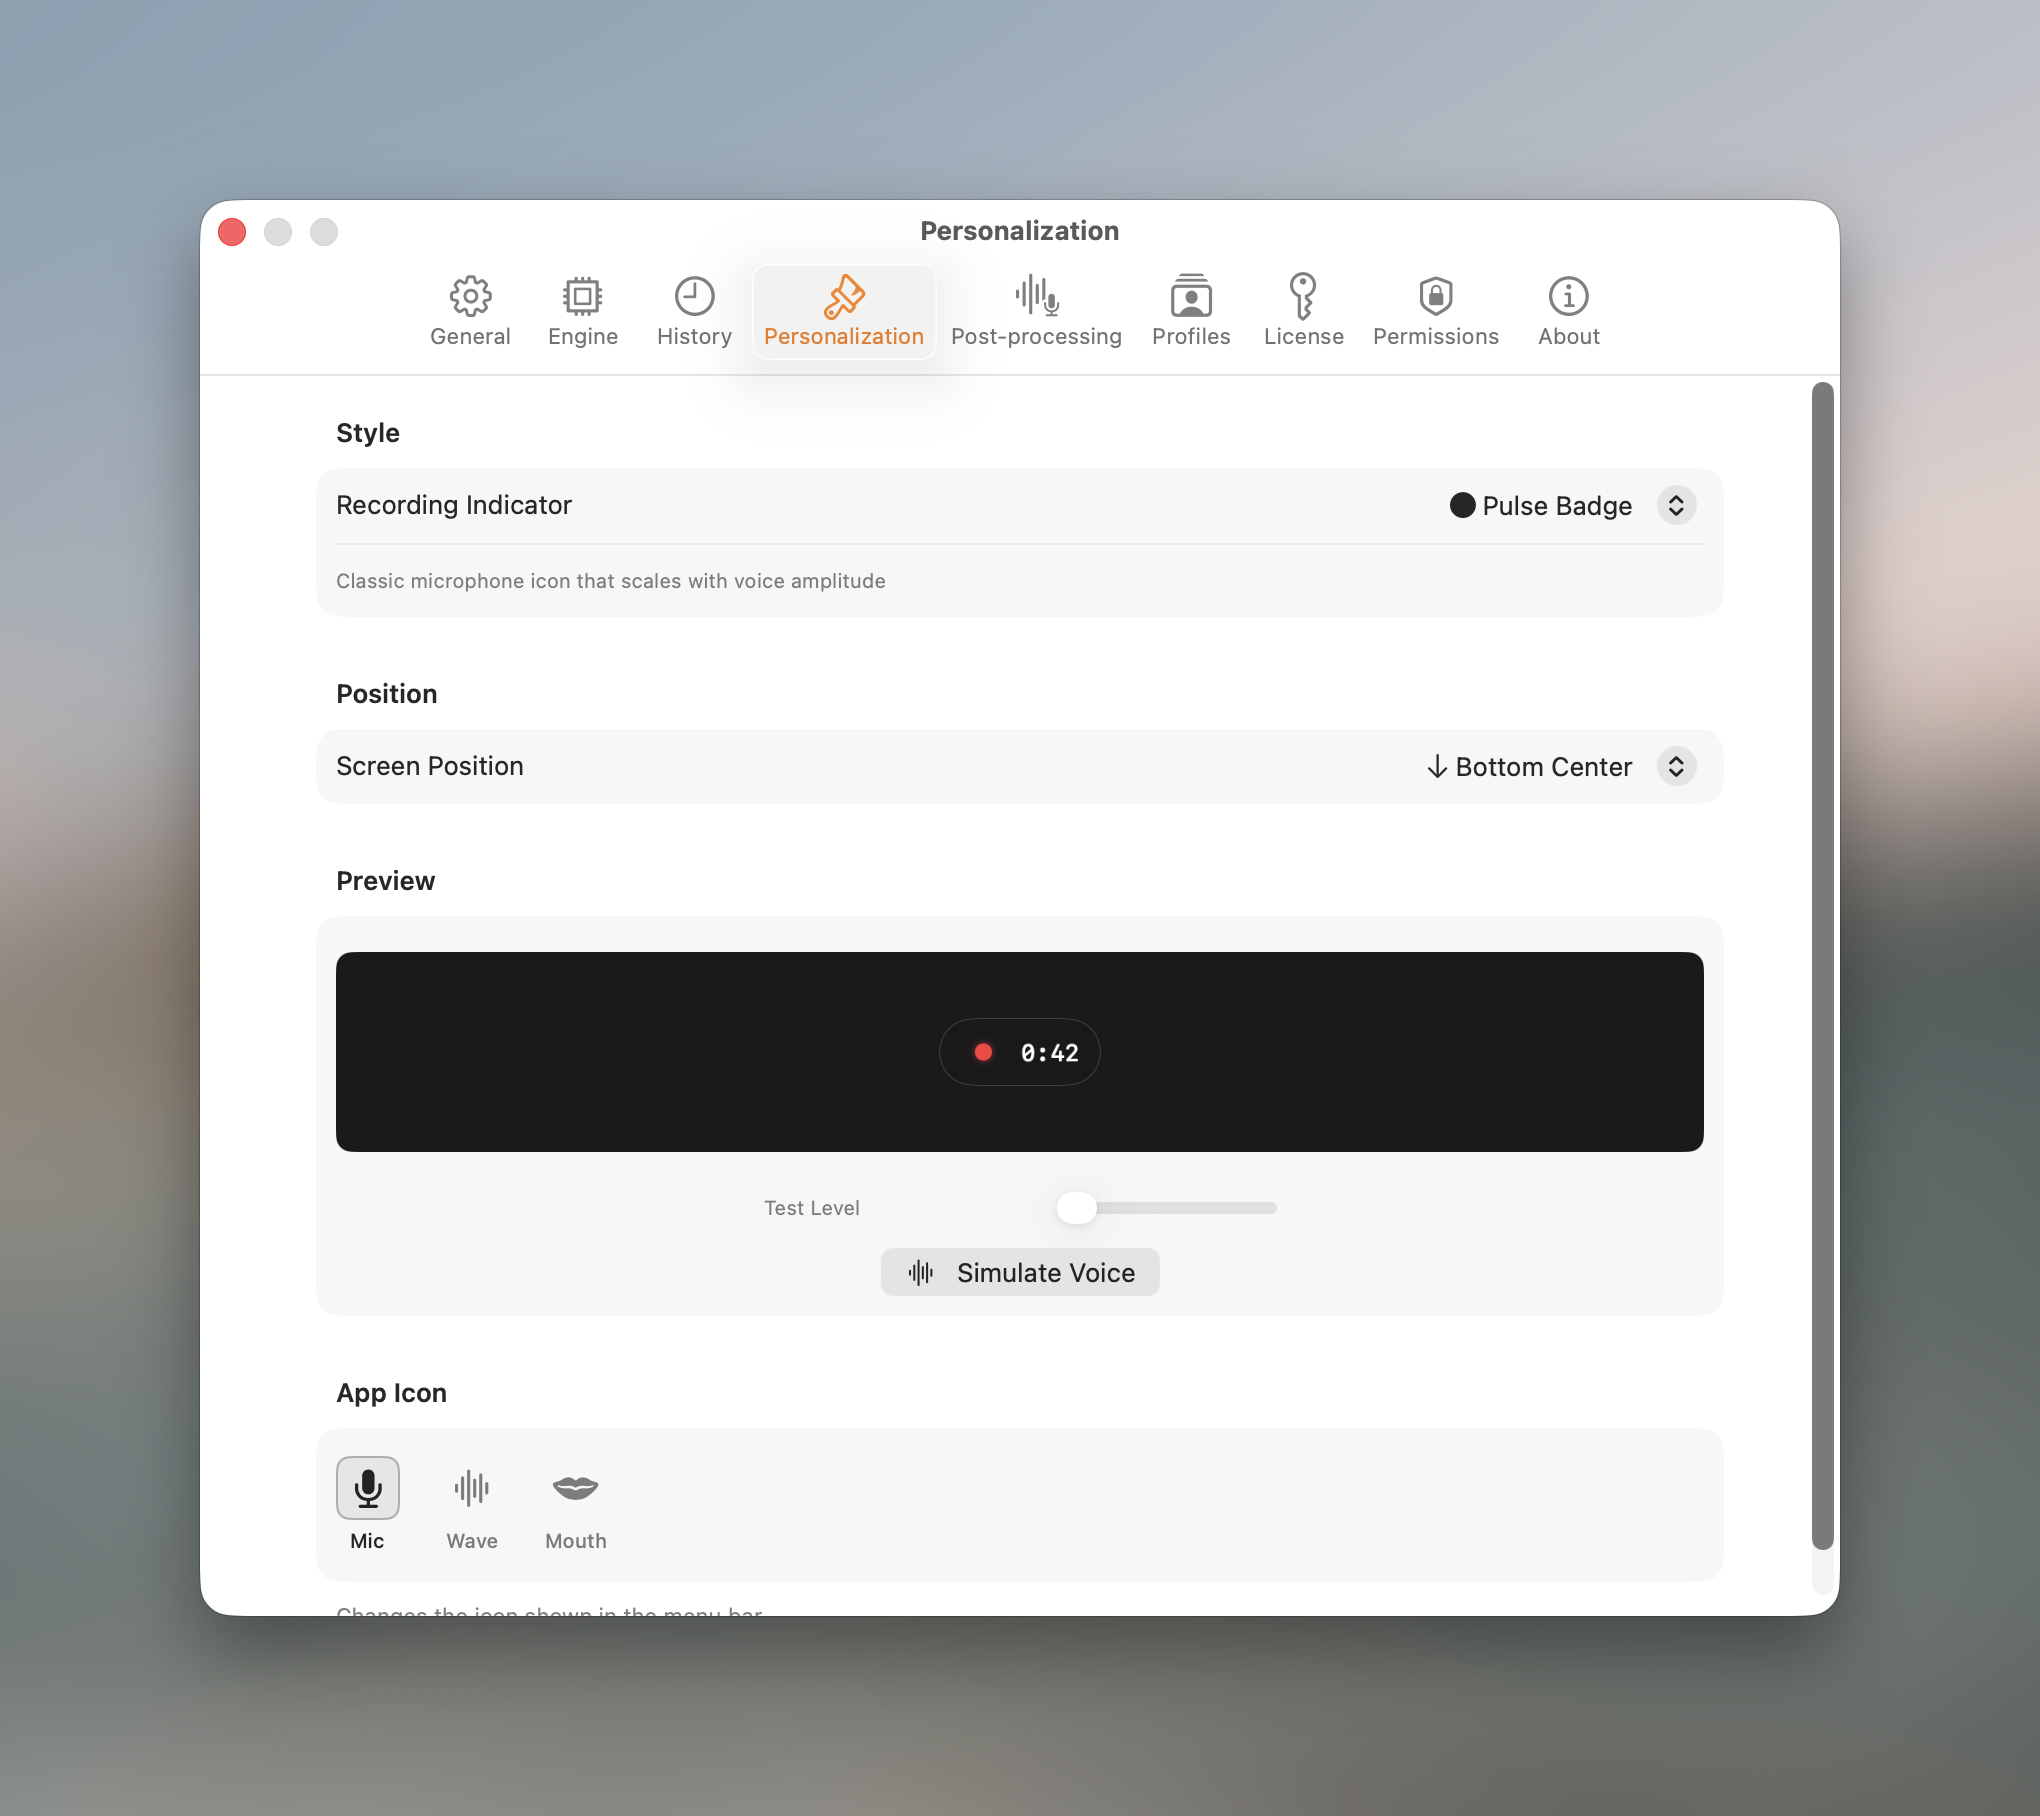
- Indicator style. Ten looks, from a subtle Pulse Badge or Micro Bars to a Glow Pill, Volume Arc, Floating Orb, Ring Pulse, Sound Ring, Typography, Cassette, or a bold Brutalist style.
- Position. Place the indicator wherever suits your screen.
- Live preview. Test any style with the audio-level slider or the "Simulate voice" button before committing.
- App icon. Choose a mic, waveform, or mouth glyph.
12. Settings · Permissions
Dictato asks for a small set of macOS permissions, each for a clear reason.
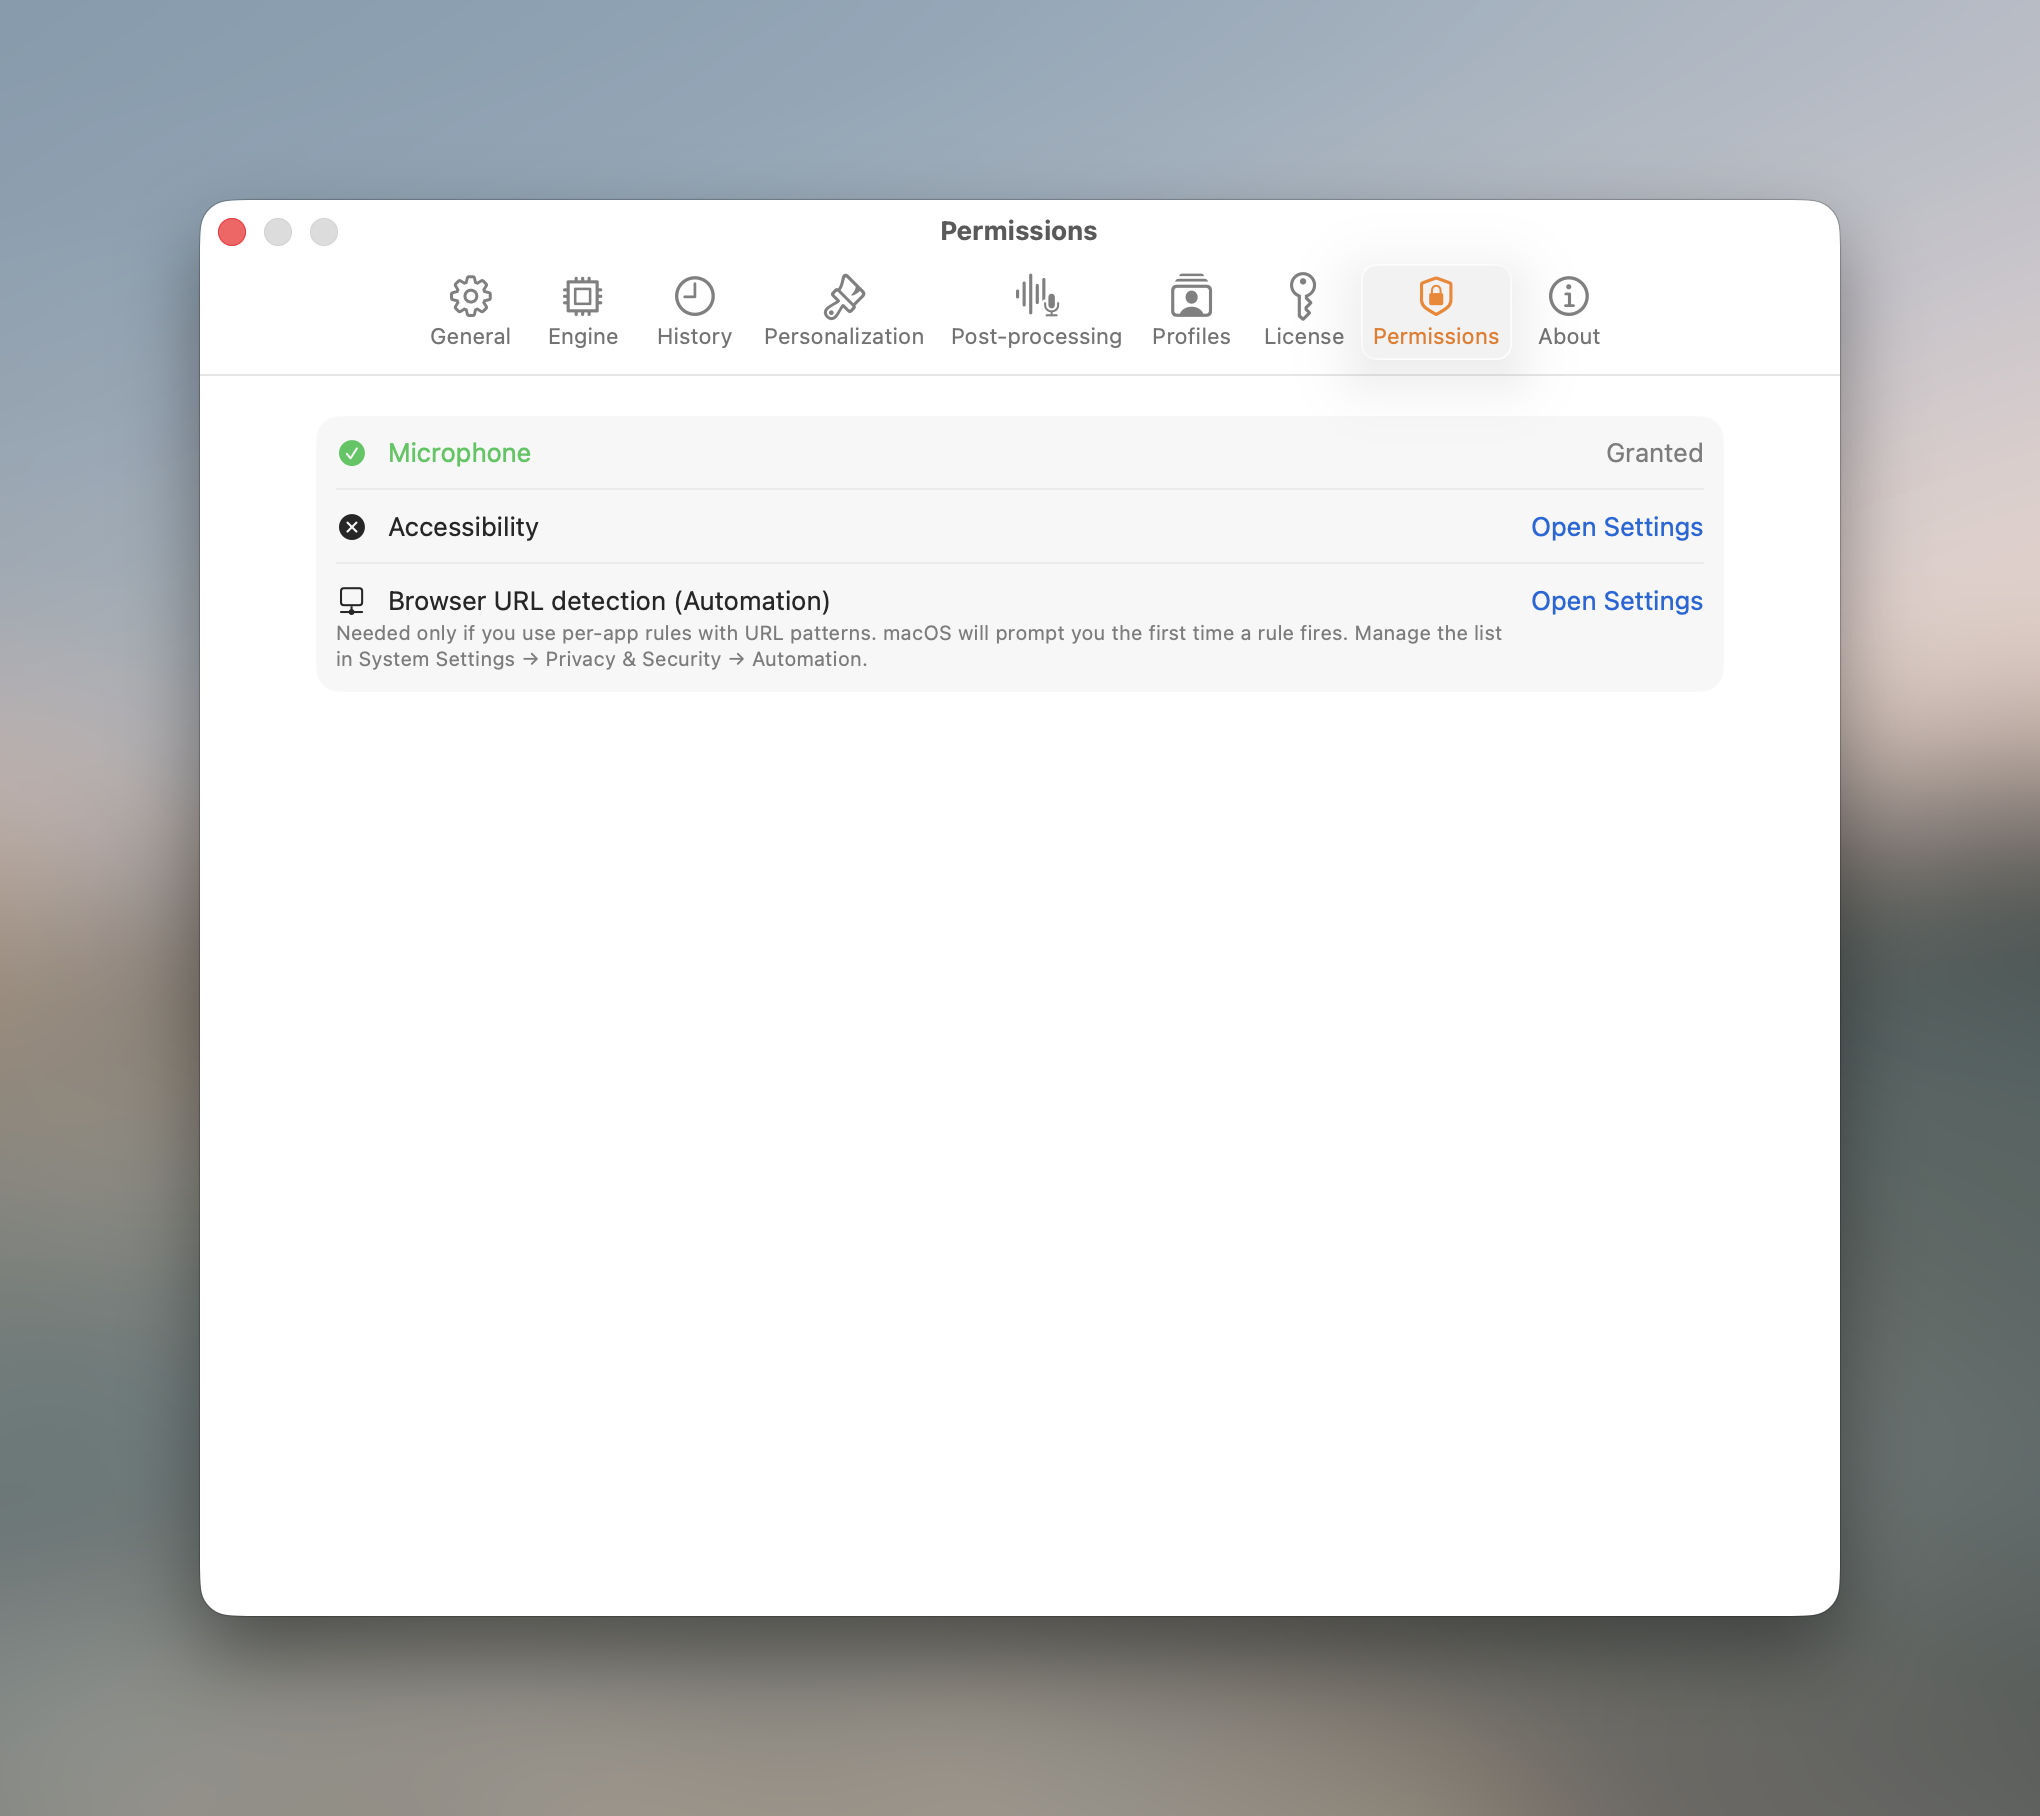
- Microphone: to record your voice while you hold the key.
- Accessibility: to insert the finished text at your cursor in any app.
- Automation: optional, used only by per-site browser rules to read the current tab's address. The prompt appears the first time such a rule runs.
13. Help & troubleshooting
A few quick fixes for the most common issues:
- Text isn't being inserted. Grant Accessibility permission (section 12); without it Dictato can transcribe but not type into other apps.
- Nothing is recorded. Check Microphone permission and that the right input device is selected in macOS Sound settings.
- The AI options are greyed out. Auto-correct, auto-translate, and AI tones need an Apple Intelligence-capable Mac. Tone rewrites can use the bundled Gemma engine instead.
- Want to dictate offline? Download a transcription model once (section 7); after that Dictato works with no internet connection.
Still stuck? See the frequently asked questions on the homepage or our dictation troubleshooting guide, or choose Report a Bug from Dictato's menu bar to reach us directly.